
Which requirements does the Excel file have to meet?
The columns for the custom fields have to exist in the Excel file before you upload it. snapAddy VisitReport can only map columns that are present in the header row of the file.
- Every piece of information sits in its own column with a meaningful header in row 1.
- The contact data sits in one worksheet, directly below the header row.
Standard details such as Salutation, Title, First name, Last name, Company, Position, Website, Phone, Fax, Mobile, E-mail, Street, Address Line 2, Zip / Postal Code and City already have fixed fields in the inventory data. Everything beyond that, for example customer ID, company size or customer segment, belongs in a custom field.

How can I create an additional field for my own column?
Create an additional field during the import in the Import inventory data dialog, at the bottom in the section Additional fields. There you enter the field name and assign the corresponding column of the Excel file via Choose a column....
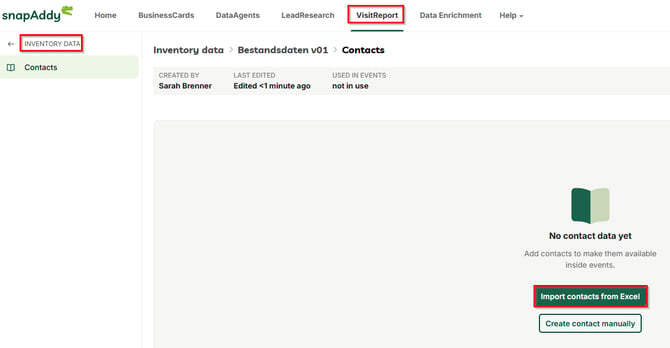
Start the import in the snapAddy dashboard under VisitReport in the section Inventory data or in the Global Inventory Data section: open the inventory data list you want to use, switch to Contacts and click Import contacts from Excel.
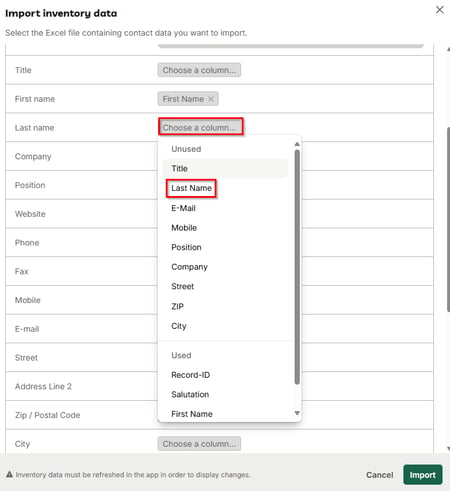
After selecting the Excel file, assign the matching column of your file to each field via Choose a column.... Columns that are still available appear in the selection menu under Unused, columns already assigned under Used.
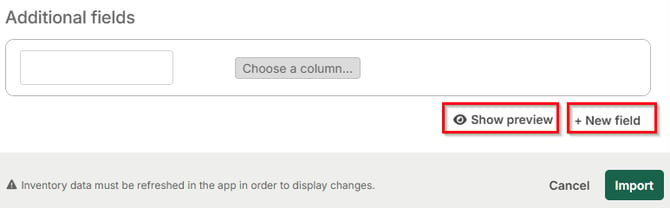
This is how you create a custom field:
- Scroll down in the Import inventory data dialog to the section Additional fields.
- Enter the name under which the custom field is to appear in the inventory data, for example customer ID.
- Use Choose a column... to select the column of your Excel file whose values are written into this field.
- Click + New field if you want to create a further custom field.
- Check the mapping via Show preview and then start the import with Import.
Where are the custom fields displayed?
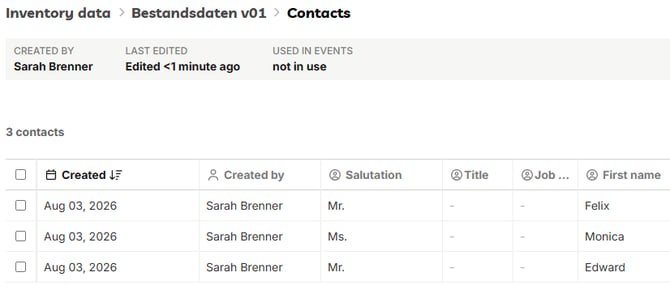
After the import, the custom fields appear in the contact list of the inventory data as well as in the VisitReport app, as soon as you have selected a contact from the inventory data for a report.
The contact list shows the assigned fields for every imported record. This way your team has not only the contact details at hand during a conversation, but also the commercial information from the CRM system.
In the VisitReport app the new fields only appear after a refresh of the inventory data, as the import dialog points out in the bottom left corner:
- Open the event you want to work with in the VisitReport app.
- Click the profile icon in the top right corner.
- Click Refresh inventory data.
- Once the data has been downloaded, click Start Report and select Inventory data to see the updated fields.
As long as the inventory data has not been refreshed in the app, the app works with the version downloaded last. This also applies in offline mode.
Which questions commonly come up next?
How do you use inventory data in an event?
Activate the inventory data in the event you want to use and choose between a predefined inventory data list and event-specific inventory data. All steps are described in the article Inventory data in events.
What is the Record-ID in the inventory data used for?
The Record-ID assigns a unique attribute to an inventory data record during import, for example a contact ID from the CRM system, and is contained in the export of the captured reports. Read the details in the article Usage of Record-ID in the Inventory Data.
Why is the ID from the inventory data not displayed?
The snapAddy API distinguishes two types of ID: the automatically generated ID of the contact and an optional ID submitted by the user. Which ID is filled in which case is explained in the article ID from Inventory Data is not displayed.
If you have more questions, feel free to contact our support under support@snapaddy.com or your Customer Success Manager.