
With the direct integration or the "Transfer" button of snapAddy LeadResearch, you can move contact and company data from business networks into LeadResearch or directly into the CRM system in just a few clicks. Duplicate check, email validation, and data enrichment run automatically in the background — for maximum data quality with minimum effort.
Contents of this article
- How do I use the direct integration?
- How do I use the "Transfer" button?
- How do I configure the settings of the "Transfer" button and the direct integration?
- What are the requirements for the direct integration?
How do I use the direct integration?
Once all requirements are met, the integration is automatically displayed in the side panel on every personal or company page within the business network. The import takes just a few steps:
Step 1 – Open profile
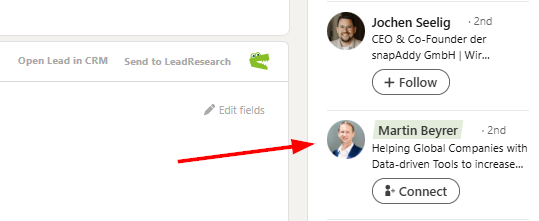
Open the desired personal or company profile in the business network. The snapAddy integration appears directly in the side panel of the profile and automatically detects the available data.
Step 2 – Review data
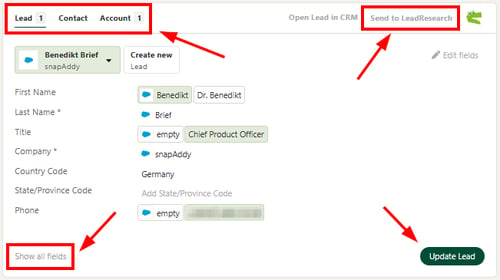
Using the "Show all fields" button, you can see all fields that are available in the CRM system. In the upper area of the capture mask, assigned CRM entities such as leads, contacts, or accounts are displayed — including a notice if duplicates have already been found.
Step 3 – Check duplicates and compare values
The duplicate check runs automatically in the background. If the data found in the network differs from the values stored in the CRM system, a clear comparison view is shown. For each field, you select the desired value — the final selection is highlighted in green.
Step 4 – Validate business email address (optional)
If no business email address is stored in the profile, click on "Find email address". snapAddy researches the address based on the name and company domain. The integrated email validator then checks the validity of the address in real time. This way, only verified email addresses make it into the CRM system — an important contribution to data quality and to reducing bounce rates in campaigns.

Step 5 – Transfer data to the CRM system
Data marked in green is transferred to the CRM system or updated there with a single click.
Did you know? In the contact overview in the side panel, a green marker indicates whether a contact already exists in the CRM system.
How do I use the "Transfer" button?
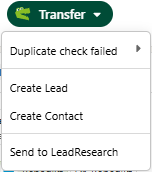
The "Transfer" button has different functions that can be activated or deactivated in the LeadResearch settings.
Process with workflow
This requires an active workflow in LeadResearch with the corresponding trigger. The captured contact then automatically goes through the defined steps such as enrichment, validation, or forwarding to specific recipients.
Create new CRM entity (e.g. lead or contact)
With this option, you create a new entity such as a contact, lead, or account directly in the connected CRM system. Existing data records are suggested for updating when a duplicate is detected.
Send to LeadResearch
This option transfers the profile to the contact list stored in the LeadResearch settings. This way, contacts can first be collected, enriched, and exported to the CRM system in bulk at a later time.
Note: If no transfer option is selected in the settings, the "Transfer" button is hidden on the pages of the business networks.
How do I configure the settings of the "Transfer" button and the direct integration?
So that the LeadResearch overview appears on the pages of the business networks and the desired actions are available, the settings must be configured once in the dashboard:
- Open the Settings section in the LeadResearch dashboard.
- Activate the checkbox "Enable LinkedIn integration".
- Activate the direct integration under LeadResearch overview with the option "Show LeadResearch overview on LinkedIn pages" (a supported CRM system is required).
- Under Transfer options, select the actions that should appear in the menu of the "Transfer" button:
- "Create new CRM entities"
- "Send to LeadResearch"
- "Process with workflow"
- Click on "Update business socials settings" to save the changes.
Tip: The selection can be adjusted at any time. This way, you centrally control which options are available to your users.
What are the requirements for the direct integration?
Requirements for use
The following points must be met in order to use the direct integration:
| Requirement | Description |
|---|---|
| Active license | A valid LeadResearch license is required. |
| CRM connection | The CRM system must be successfully connected in the settings. → How to connect snapAddy to my CRM? |
| snapAddy Helper | The browser extension must be installed and enabled. → What is the snapAddy Helper and how can I install it? |
| Network login | An active browser session is required in the relevant business network. → How can I log in to business networks in my browser? |
Supported CRM systems for the direct integration
- Salesforce
- Microsoft Dynamics
- SAP
- Pipedrive
- HubSpot
Please make sure that a connection to one of the systems listed above is established before using the integration.
CRM mapping – individual field assignment
For many CRM systems, a default mapping is already in place, covering the most important fields out of the box. Additional or custom fields can be flexibly adjusted via the system integration.
Data privacy and GDPR
All processing is carried out in compliance with the GDPR. Further information on data processing can be found here: Data privacy at snapAddy (GDPR, ODP, TOMs)
Related articles
- What is the snapAddy Helper and how can I install it?
- How do I connect snapAddy with my CRM system?
- Which values are pre-selected when capturing a lead, contact, or company if a duplicate has been found in the CRM?
- What is changing with the rebranding from DataQuality to DataAgents and LeadResearch?
- Which business networks does snapAddy support?
- Explained: The snapAddy duplicate check for your CRM